1. 1주차 ~ 8주차에 배웠던 모든 문법이 들어있는 소스
#define _CRT_SECURE_NO_WARNINGS
#include <iostream>
#include <string>
using std::cout;
class Cat {
private: //생략가능
	int age;
	char name[20];
	// const char* name; //A
public:
	Cat(int age, const char* n) {
		this->age = age;
		strcpy(name, n); // name=n; //A
		cout << name << "고양이 객체가 만들어졌어요.\n";
	}
	~Cat() { cout << name << "객체 바이\n"; };
	int getAge();
	const char* getName();
	void setAge(int age);
	void setName(const char* pName);
	void meow();
};
int Cat::getAge() {
	return age;
}
void Cat::setAge(int age) {
	this->age = age; //this는 7번째 줄에 있는 age를 가르킴
}
void Cat::setName(const char* pName) {
	strcpy(name, pName);
	//strcpy(대상주소, 원본주소);
	//strcpy_s(대상주소, 대상의길이, 원본주소);
	//name=pName; //A
}
const char* Cat::getName() {
	return name;
}
void Cat::meow() {
	cout << name << "고양이가 울어요\n";
}
int main() {
	Cat nabi(1, "나비"), yaong(1, "야옹"), * pNabi;
	cout << nabi.getName() << " 출생 나이는 " << nabi.getAge() << "살이다.\n";
	cout << yaong.getName() << " 출생 나이는 " << yaong.getAge() << "살이다.\n";
	pNabi = &nabi;
	cout << pNabi->getName() << " 출생 나이는 " << pNabi->getAge() << "살이다.\n";
	nabi.setName("Nabi");
	nabi.setAge(3);
	cout << nabi.getName() << " 나이는 " << nabi.getAge() << "살이다.\n";
	yaong.meow();
	nabi.meow();
	return 0;
}
2. self 키워드와 this 키워드의 차이
- self와 this는 모두 객체 자신을 가리키는 키워드이다. 하지만 두 키워드의 사용법에는 약간의 차이가 있다.
- self 키워드는 클래스 내부에서만 사용할 수 있다. 클래스 내부에서 self 키워드를 사용하면 해당 클래스의 인스턴스를 가르킨다.
- this 키워드는 클래스 내부와 외부에서 모두 사용할 수 있다. 클래스 내부에서는 self 키워드와 같은 의미로 사용된다. 하지만 클래스 외부에서는 현재 실행 중인 함수의 인스턴스를 가르킨다.
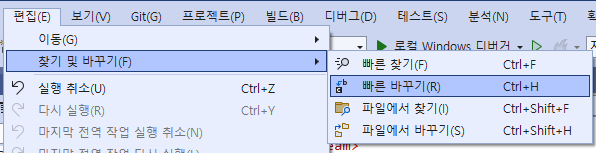
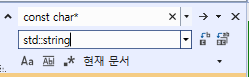
3. const char*를 std::string으로 일괄 변경하는 방법
4. 1번의 소스에 있는 const char*형을 std::string형으로 바꾼 소스
#define _CRT_SECURE_NO_WARNINGS
#include <iostream>
#include <string>
using std::cout;
class Cat {
private: //생략가능
	int age;
	std::string name;
	// std::string name; //A
public:
	Cat(int age, std::string n) {
		this->age = age;
		name=n; //A
		cout << name << "고양이 객체가 만들어졌어요.\n";
	}
	~Cat() { cout << name << "객체 바이\n"; };
	int getAge();
	std::string getName();
	void setAge(int age);
	void setName(std::string pName);
	void meow();
};
int Cat::getAge() {
	return age;
}
void Cat::setAge(int age) {
	this->age = age; //this는 7번째 줄에 있는 age를 가르킴
}
void Cat::setName(std::string pName) {

	name=pName; //A
}
std::string Cat::getName() {
	return name;
}
void Cat::meow() {
	cout << name << "고양이가 울어요\n";
}
int main() {
	Cat nabi(1, "나비"), yaong(1, "야옹"), * pNabi;
	cout << nabi.getName() << " 출생 나이는 " << nabi.getAge() << "살이다.\n";
	cout << yaong.getName() << " 출생 나이는 " << yaong.getAge() << "살이다.\n";
	pNabi = &nabi;
	cout << pNabi->getName() << " 출생 나이는 " << pNabi->getAge() << "살이다.\n";
	nabi.setName("Nabi");
	nabi.setAge(3);
	cout << nabi.getName() << " 나이는 " << nabi.getAge() << "살이다.\n";
	yaong.meow();
	nabi.meow();
	return 0;
}
위의 소스에서 pName을 name로 바꾼 후 this 키워드를 이용하여 깔끔하게 정리한 모습
#define _CRT_SECURE_NO_WARNINGS
#include <iostream>
#include <string>
using std::cout;
class Cat {
private: //생략가능
	int age;
	std::string name;
	// std::string name; //A
public:
	Cat(int age, std::string n) {
		this->age = age;
		this->name=name; //A
		cout << name << "고양이 객체가 만들어졌어요.\n";
	}
	~Cat() { cout << name << "객체 바이\n"; };
	int getAge();
	std::string getName();
	void setAge(int age);
	void setName(std::string name);
	void meow();
};
int Cat::getAge() {
	return age;
}
void Cat::setAge(int age) {
	this->age = age; //this는 7번째 줄에 있는 age를 가르킴
}
void Cat::setName(std::string name) {

	this->name=name; //this는 8번째 줄에 있는 name를 가르킴
}
std::string Cat::getName() {
	return name;
}
void Cat::meow() {
	cout << name << "고양이가 울어요\n";
}
int main() {
	Cat nabi(1, "나비"), yaong(1, "야옹"), * pNabi;
	cout << nabi.getName() << " 출생 나이는 " << nabi.getAge() << "살이다.\n";
	cout << yaong.getName() << " 출생 나이는 " << yaong.getAge() << "살이다.\n";
	pNabi = &nabi;
	cout << pNabi->getName() << " 출생 나이는 " << pNabi->getAge() << "살이다.\n";
	nabi.setName("Nabi");
	nabi.setAge(3);
	cout << nabi.getName() << " 나이는 " << nabi.getAge() << "살이다.\n";
	yaong.meow();
	nabi.meow();
	return 0;
}
5. const 변수
- 변수에 const라는 키워드를 사용하여 상수(constant)의 의미를 갖게 하여 그 내용을 변경할 수 없게 한다.
- #define IN 10
// 전처리기로 컴파일 전에 IN을 10로 변경 - const int x=1; // 변수 x는 항상 초기값 1, 변경 불가
반드시 초기값 필요함 - int const y=1; // 비추, const는 자료형 앞에 씀
- const int z{1}; // Uniform initialization, C++11
z{}라고 쓰면 자동으로 0으로 초기화 - constexpr int a = 5; // C++11부터 가능, compile-time constant
- #define IN 10
6. 5번의 const 변수를 활용한 예제
- 밑의 소스에서 const가 붙은 변수들은 다 변경이 불가능하다. (상수로 바뀌었기 때문)
#define IN 1 // 컴파일 전에 IN을 찾아서 1로 바꿈
#include <iostream>
int main()
{
	const int x = 2; // 변수 x는 항상 1, 변경 불가, 초기값 지정해야
	int const y = 3; // 비추, const는 자료형 앞에 씀
	const int z{ 4 }; // Uniform initialization, C++11, z{}
	constexpr int a = 5; //C++11부터 가능, compile-time constant
	//x = 2; //변경 불가
	std::cout << IN << x << y << z << a;
	return 0;
} //http://cpp.sh/ 에서 c++ 98버전으로 작동시킬 시 7,8행은 작동하지 않는다.
7. 멤버변수를 변경하지 못하는 함수는 const 함수이다.
8.
#include <iostream>
class Dog {
	int age; //private 생략함
public:
	int getAge() const;
	void setAge(int a) { age = a; }
	void view() const { std::cout << "나는 view"; }
};
int Dog::getAge() const
{
	view(); // 이렇게만 쓰면 const 함수는 const 함수만 호출할 수 있기 때문에 오류가 발생,
    		// 7행의 view 함수를 const 함수로 변경
	return age; // ++age로 썼을 때 - error C3490 : 'age'은(는) const 개체를 통해
    			// 액세스되고 있으므로 수정할 수 없습니다. 라는 에러가 뜬다.
}
int main()
{
	Dog happy;
	happy.setAge(5);
	std::cout << happy.getAge();
	return 0;
}
9.
#include <iostream>
class Dog {
int age;
public:
Dog(int a) { age = a; }
int getAge() const;
void setAge(int a) { age = a; }
void view() const
{
std::cout << "나는 view\n";
}
};
int Dog::getAge() const
{
view();
return (age);
}
int main()
{
const Dog happy(5); //const 객체
//happy.setAge(7); // 오류, const 객체 happy에는 const로 지정된 멤버함수만 호출할 수 있다.
// 해당 클래스의 어떠한 멤버변수도 바꾸지 않는 멤버함수(get으로 시작하는 함수)는
// const형으로 선언하는 것이 좋다.
std::cout << happy.getAge();
return 0;
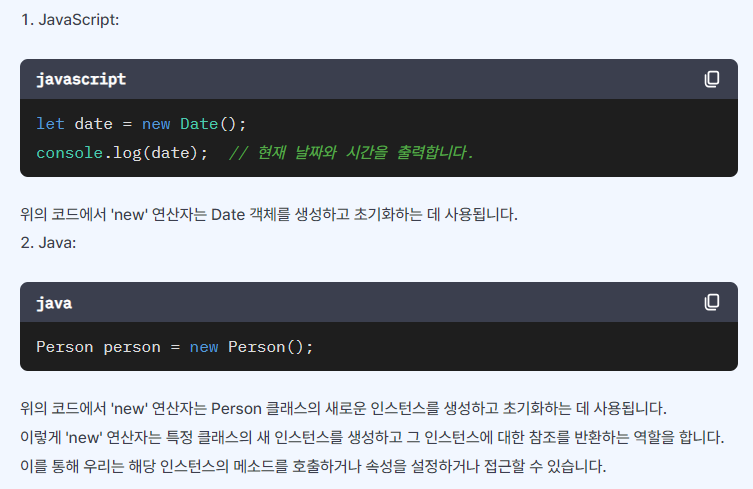
}10. new 연산자를 사용하는 프로그래밍 언어를 예를 들어 설명
'new' 연산자는 주로 객체 지향 프로그래밍 언어에서 사용되며, 메모리에 새로운 객체를 생성하고 초기화하는 데 사용된다.
11. 강의자료 45쪽에 나오는 소스를 python tutor을 사용하여
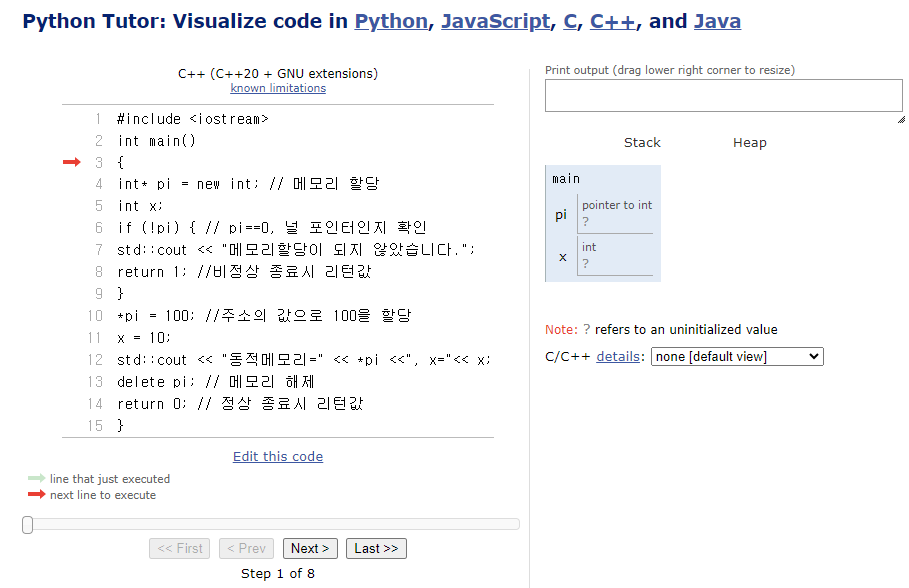
12. 45쪽의 소스 : 하나의 정수에 대한 메모리 할당과 해제 : 정적 vs. 동적
- new를 썼으면 (4행) delete로 메모리를 해제해주어야 한다 (15행).
- delete를 하지 않으면 프로그램이 끝나도 메모리를 계속 잡고있어 다른 프로그램에서 메모리 사용을 할 수 없다.
#include <iostream>
int main()
{
	int* pi = new int;	// 동적 메모리 할당
	int x;				// 정적 메모리 할당

	if (!pi) { // pi==0, 널 포인터인지 확인
		std::cout << "메모리할당이 되지 않았습니다.";
		return 1; //비정상 종료시 리턴값
	}
	*pi = 100; //주소의 값으로 100을 할당
	x = 10;
	std::cout << "동적메모리=" << *pi << ", x=" << x;

	delete pi; // 메모리 해제
	return 0; // 정상 종료시 리턴값
}
13. 동적 메모리의 할당과 해제: new와 delete
- 기본 자료형
- 포인터변수=new 자료형;
int *pi=new int; // 정수형 자료를 저장하기 위한 4바이트 공간할당. pi는 첫번째 공간의 주소 - 포인터변수=new 자료형(초기값);
int *pi=new int(2); //초기값을 줄 경우 - delete 포인터변수;
delete pi;
- 포인터변수=new 자료형;
- 배열
- 포인터변수=new 배열;
int *pi=new int[5] ; // 정수형 자료 5개를 저장하기 위한 20바이 트 공간할당. pi는 첫번째 공간의 주소 - delete []포인터변수;
delete []pi; //주의: []써야 함
- 포인터변수=new 배열;
14. 동적메모리 할당(필요한 만큼의 메모리만 실행시 할당)
#include <iostream>  // 표준 입출력을 위한 라이브러리를 포함합니다.
#include <stdlib.h>  // exit 함수를 사용하기 위한 라이브러리를 포함합니다.

int main()  // 메인 함수를 선언합니다. 프로그램 실행의 시작점입니다.
{
	int i, n;  // 두 개의 정수형 변수를 선언합니다.
	int* num;  // 정수형 포인터 변수를 선언합니다.
		std::cout << "몇 개의 숫자를 입력하시겠습니까==";
        // 사용자에게 입력할 숫자의 개수를 물어봅니다.
	std::cin >> i;  // 사용자의 입력을 받아 'i'에 저장합니다.
	num = new int[i];  // 'i'의 개수만큼의 정수형 배열을 동적으로 할당합니다.
	if (num == NULL) exit(1);  // 동적 할당이 실패한 경우 프로그램을 종료합니다.
	for (n = 0; n < i; n++)  // 사용자가 입력한 개수만큼 반복합니다.
	{
		std::cout << "숫자를 입력하십시오 : ";  // 사용자에게 숫자 입력을 요청합니다.
		std::cin >> num[n];  // 사용자의 입력을 받아 배열에 저장합니다.
	}
	std::cout << "당신이 입력한 숫자는: ";  // 입력받은 숫자를 출력합니다.
	for (n = 0; n < i; n++)  // 사용자가 입력한 개수만큼 반복합니다.
		std::cout << num[n] << ", ";  // 각 숫자를 출력합니다.
	delete[] num;	// 동적으로 할당한 메모리를 해제합니다. []을 생략하면,
    				// 단일 객체에 대한 메모리만 해제되어 메모리 누수가
                    // 발생할 수 있습니다. 따라서 배열로 할당한 메모리는
                    // delete[]를 사용하여 전체 메모리를 제대로 해제해야 합니다.
	return 0;  // 프로그램을 종료합니다.
}
15.
#include <iostream>  // 표준 입출력을 위한 라이브러리를 포함합니다.
class Dog {  // Dog 클래스를 선언합니다.
private:
	int age;  // 개의 나이를 나타내는 private 멤버 변수를 선언합니다.
public:
	int getAge();  // 나이를 반환하는 메서드를 선언합니다.
	void setAge(int a);  // 나이를 설정하는 메서드를 선언합니다.
};
int Dog::getAge()  // Dog 클래스의 getAge 메서드를 정의합니다.
{
	return age;  // 개의 나이를 반환합니다.
}
void Dog::setAge(int a)  // Dog 클래스의 setAge 메서드를 정의합니다.
{
	age = a;  // 개의 나이를 설정합니다.
}
int main()  // 메인 함수를 선언합니다. 프로그램 실행의 시작점입니다.
{
	Dog* dp;  // Dog 클래스의 포인터 dp를 선언합니다.
	dp = new Dog[10];  // Dog 클래스의 객체 배열을 동적으로 10개 생성합니다.
	if (!dp) {  // 만약 메모리 할당이 실패했다면,
		std::cout << "메모리할당이 되지 않았습니다.";  // 에러 메시지를 출력하고,
		return 1;  // 프로그램을 종료합니다.
	}
	for (int i = 0; i < 10; i++)  // 10개의 Dog 객체 각각에 대해,
		dp[i].setAge(i);  // 인덱스를 나이로 설정합니다.
	for (int i = 0; i < 10; i++)  // 10개의 Dog 객체 각각에 대해,
		std::cout << i << "번째 객체의 나이는 " << dp[i].getAge() << " 입니다. " << std::endl;
        	// 인덱스와 나이를 출력합니다.
	delete[]dp;  // 동적으로 할당한 메모리를 해제합니다.
	return 0;  // 프로그램을 종료합니다.
}
16. 지난주에 학습했던 cat 클래스에 const를 추가한 소스
#define _CRT_SECURE_NO_WARNINGS
#include <iostream>
#include <string>
using std::cout;
class Cat {
private: //생략가능
	int age;
	std::string name;
public:
	Cat(int age, std::string n) {
		this->age = age;
		name = n;
		cout << name << "고양이 객체가 만들어졌어요.\n";
	}
	~Cat() { cout << name << "객체 바이\n"; };
	int getAge() const;
	std::string getName() const;
	void setAge(int age);
	void setName(std::string pName);
	void meow() const;
};
int Cat::getAge() const {
	return age;
}
void Cat::setAge(int age) {
	this->age = age;
}
void Cat::setName(std::string pName) {
	name = pName;
}
std::string Cat::getName() const {
	return name;
}
void Cat::meow() const {
	cout << name << "고양이가 울어요\n";
}
int main() {
	Cat nabi(1, "나비"), yaong(1, "야옹"), * pNabi;
	cout << nabi.getName() << " 출생 나이는 " << nabi.getAge() << "살이다.\n";
	cout << yaong.getName() << " 출생 나이는 " << yaong.getAge() << "살이다.\n";
	pNabi = &nabi;
	cout << pNabi->getName() << " 출생 나이는 " << pNabi->getAge() << "살이다.\n";
	nabi.setName("Nabi");
	nabi.setAge(3);
	cout << nabi.getName() << " 나이는 " << nabi.getAge() << "살이다.\n";
	yaong.meow();
	nabi.meow();
	return 0;
}
참고 자료 : 한성현 교수님 수업자료
'C++ 프로그래밍 (1학년 2학기)' 카테고리의 다른 글
| 231123 C++ 프로그래밍 12주차 (0) | 2023.11.23 |
|---|---|
| 231116 C++ 프로그래밍 11주차 (0) | 2023.11.16 |
| 231102 C++프로그래밍 9주차 (0) | 2023.11.02 |
| 231019 C++ 프로그래밍 7주차 (1) | 2023.10.19 |
| 231012 C++ 프로그래밍 5주차 (0) | 2023.10.12 |